
Disclaimer: I accept no responsibility for anything done to your car. This is performed at your own risk, and I am not responsible for anything that happens. I take no responsibility for any harm you directly or indirectly cause to yourself or others due to any ideas expressed or suggested in this article. This guide is for reference use only.
04/14/2008
Related Links
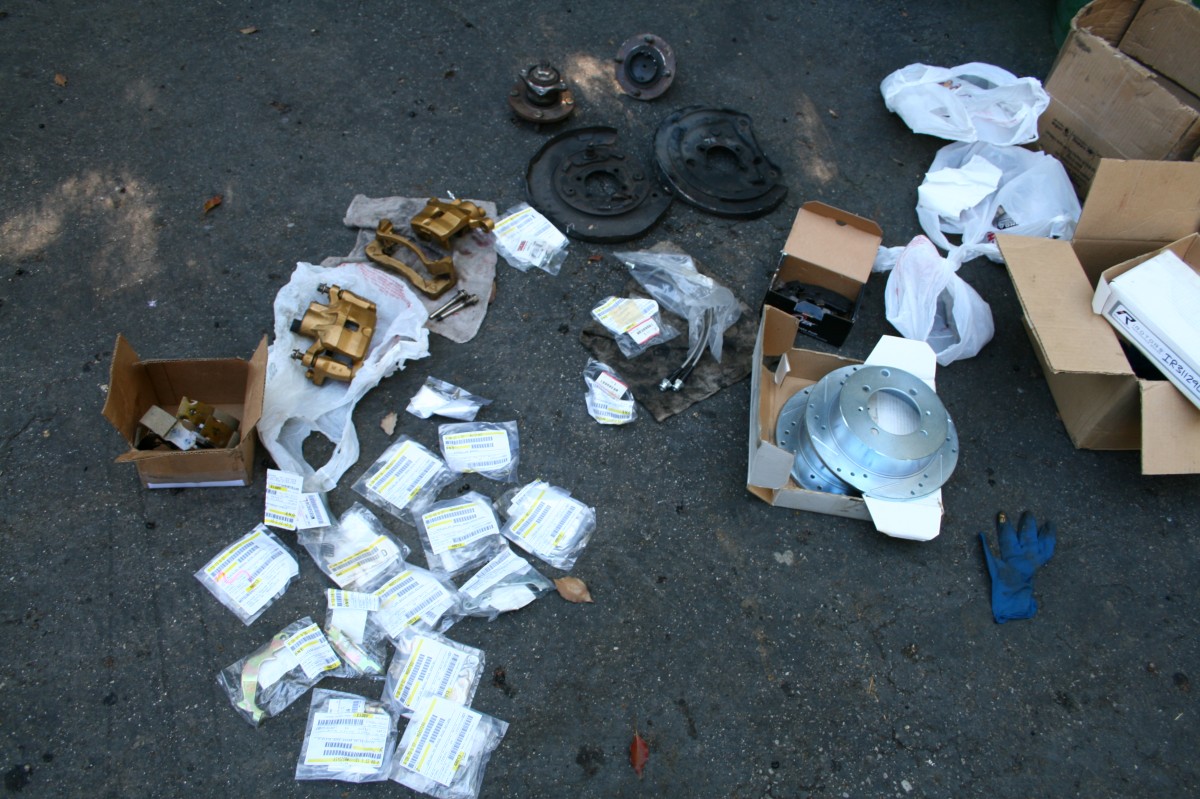
Part's list for internal parking brake components
Genuine OEM Mitsubishi Parts - Been ordering from here for years, all OEM and best prices.
Parking brake internal component map w/ part numbers
Service Manual Excerpts
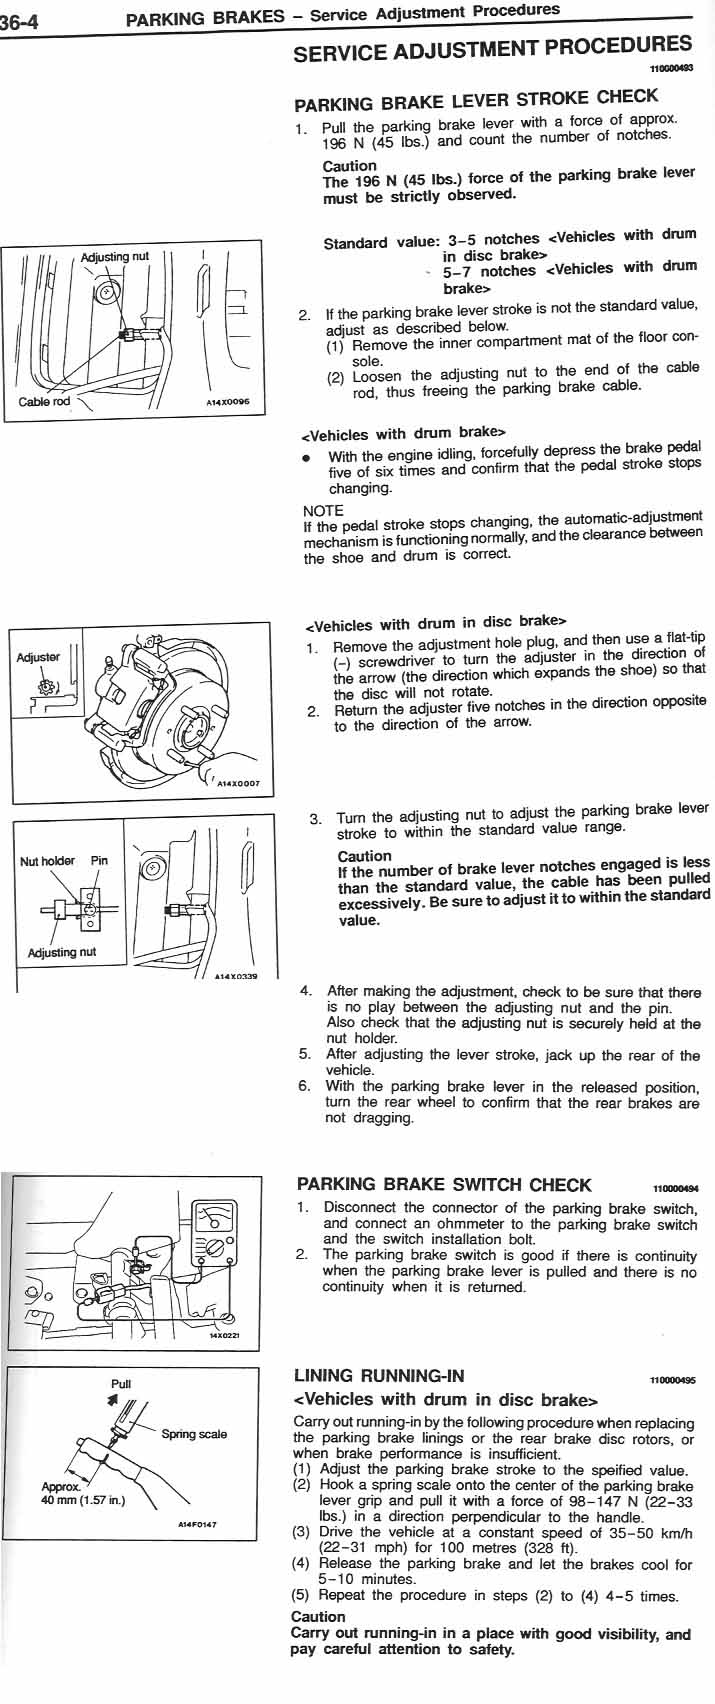
OEM Adjustment Procedure - Parking Brake Lever Stroke Check
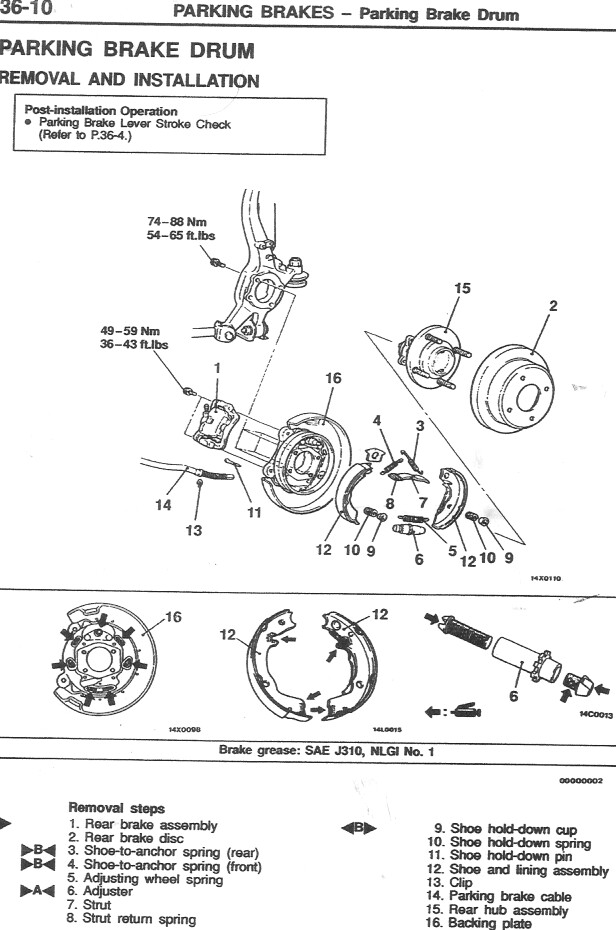
Parking Brake drum-in-disc - drum/rotor removal
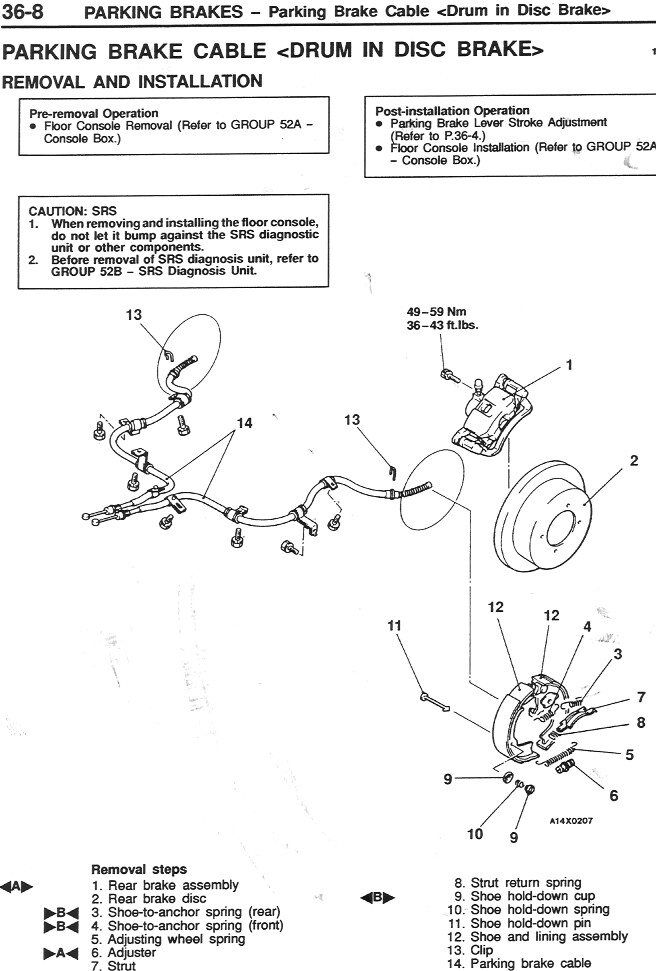
Parking Brake cable
Caliper disassembly - w/ grease points
REQUIRED SPECIAL TOOLS: (I assume you have the basic sockets, wrenches, etc.)
needle-nosed pliers (2 pairs will help when removing and setting the anchor springs)
drain pan
brake grease
flare wrench (for brake lines)
brake cleaner
Ever go driving through the twisties, and encounter brake fade? I used to wonder if other cars experienced this as quickly as I do, but it's undoubtedly due to the rear drum brakes. Replacing the rear drums with discs on the 7th generation galant is a huge performance upgrade in my opinion. If I have a lot of heavy cargo and the car is weighed down more than usual, the brakes leave a lot to be desired. Also, brake fade m is never a safe side effect when it comes to driving, especially in those spirited moments.
After my brakes were worn in, I had to relearn proper braking on a car without ABS. Along with the new discs in the rear, I also added stainless steel lines to the front and back. Simply slamming on the brakes will lock up the wheels almost instantly, since there is no flex or give anymore in the brake lines. Slowly pressing on the brakes and gradually increasing pressure will jerk necks forward and leave seatbelt marks in peoples' chests if done properly. Stopping in time is no longer a problem, but watching and worrying about the driver behind is.
Besides for having the lightning fast ability to come to a dead stop, they just look cooler too ;-).

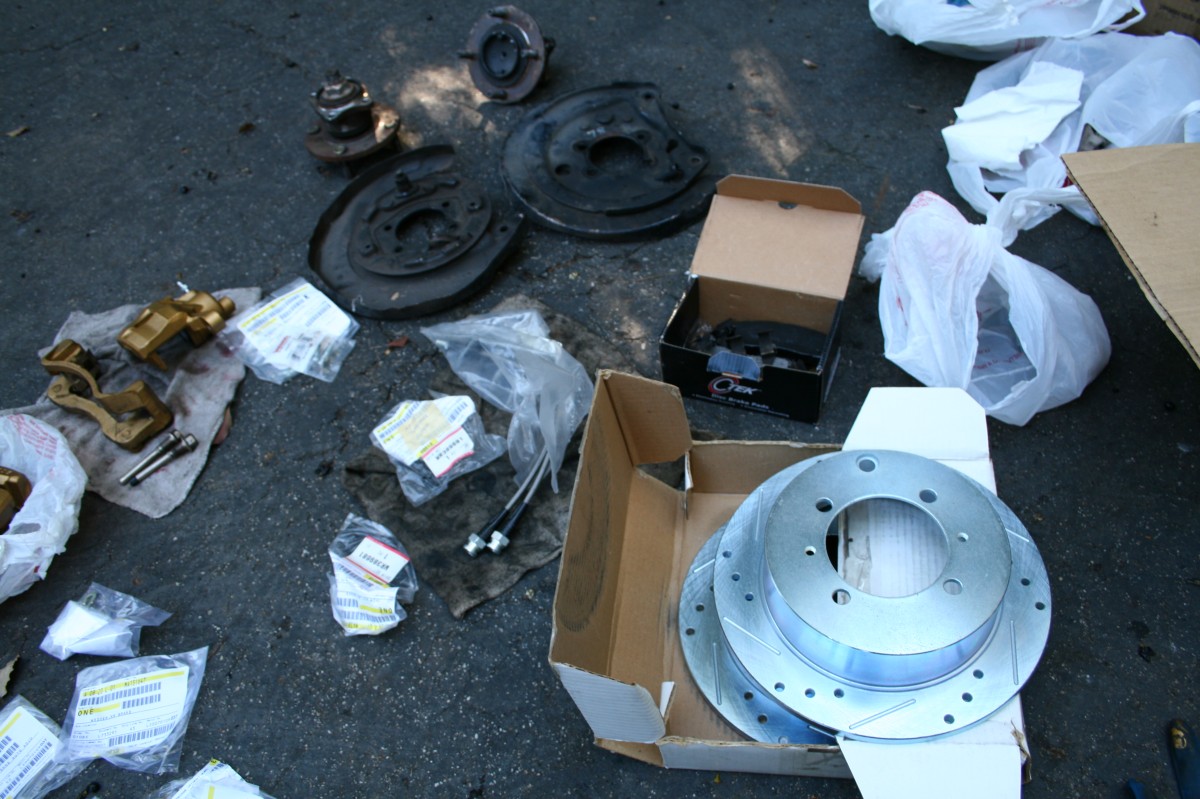
Building the parking brake is where all the work is at, due to the drum-in-disc parking brake system. You're technically not 86ing your drums, but only making them smaller, and putting them into a rotor. From now on the drum brakes in the rear will only serve as a parking/e- brake, leaving the continuous stopping to the calipers.
The photos to the left of each step generally indicate what you should be looking at during or after completing each step; click on them to enlarge (w/ notes sometimes) in a new window. This process was documented and photographed from the PASSENGER side of the vehicle. Become familiar with the service manual pages linked above, they help if it's your first time.
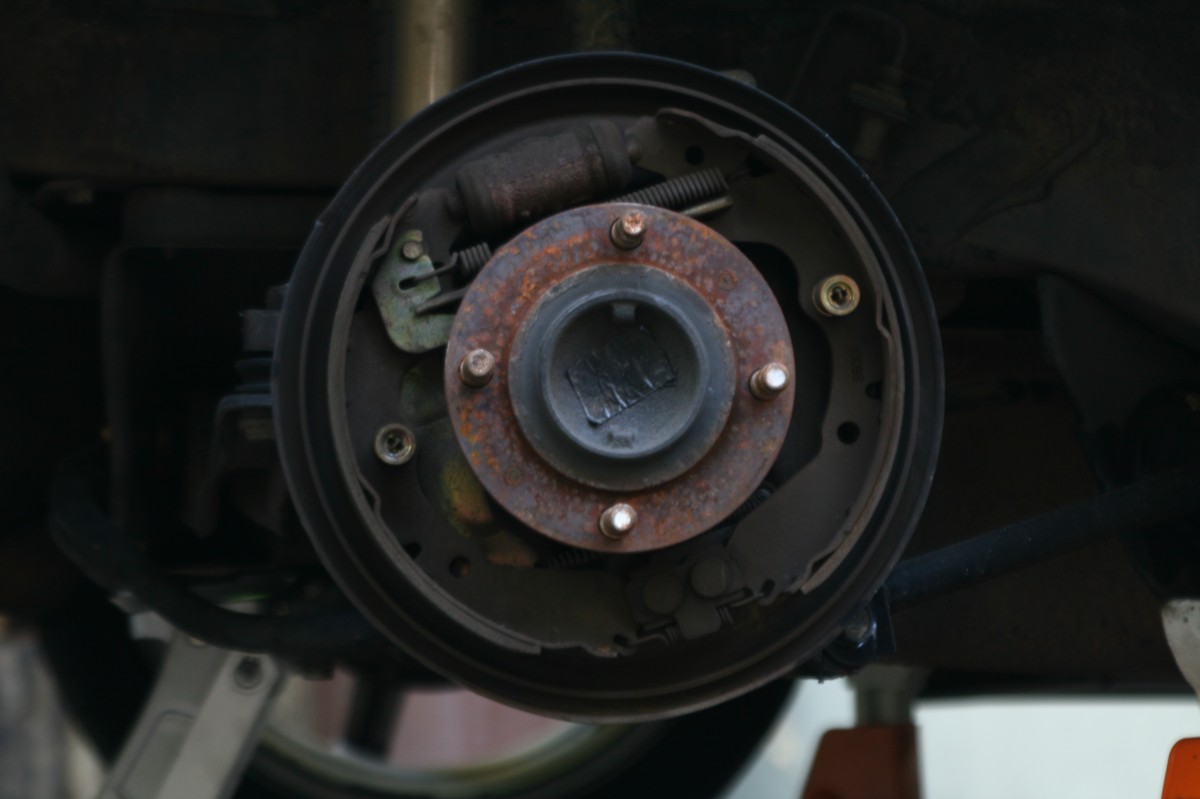
 Last time you'll see drums on this car...
 Do all the usual; break the lugnuts loose, raise the car and secure with jackstands, and remove the rear wheels. I like to place them under the car as safety, or sit on them as a stool ;-).
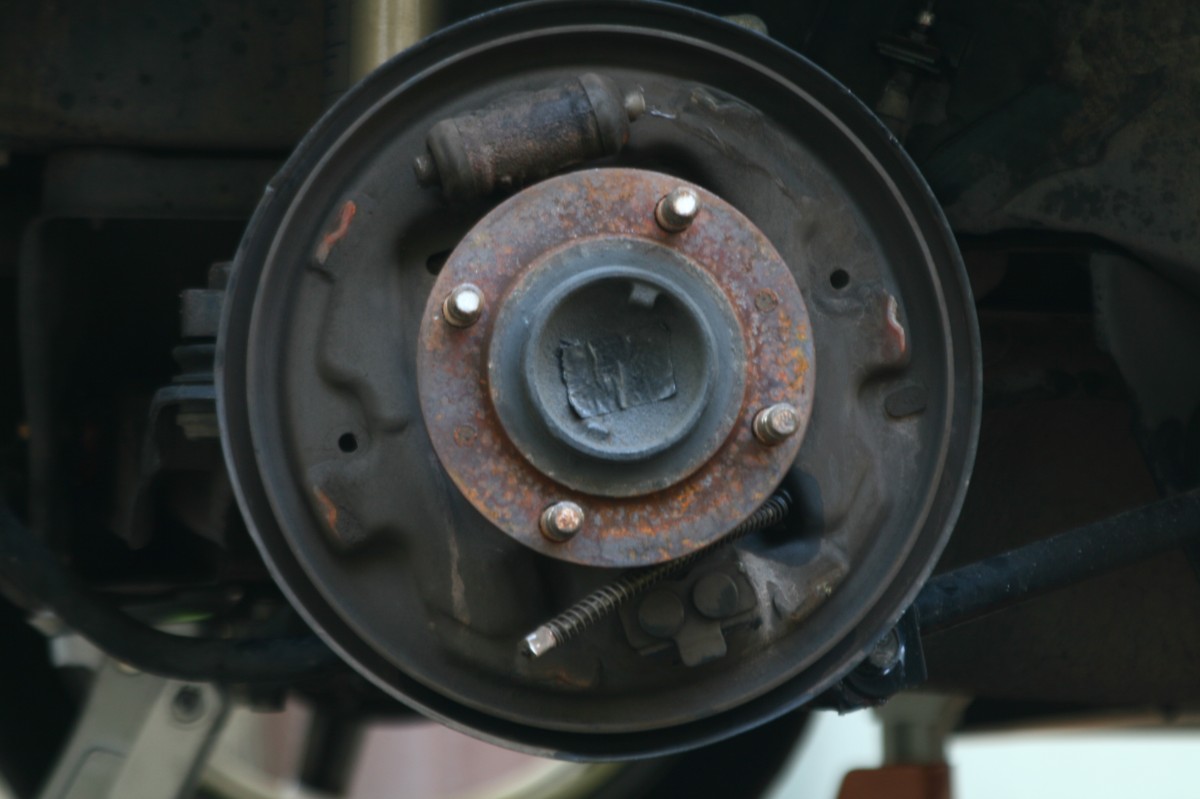
 With the wheel removed, make sure the e-brake is not engaged, and remove the drum. If yours doesn't pop off easily, you can try lightly tapping it with a metal hammer, or more violent blows with a rubber mallet. My driver side finally came off after I placed a flat-head screwdriver behind the drum on the lip and hit with a hammer.
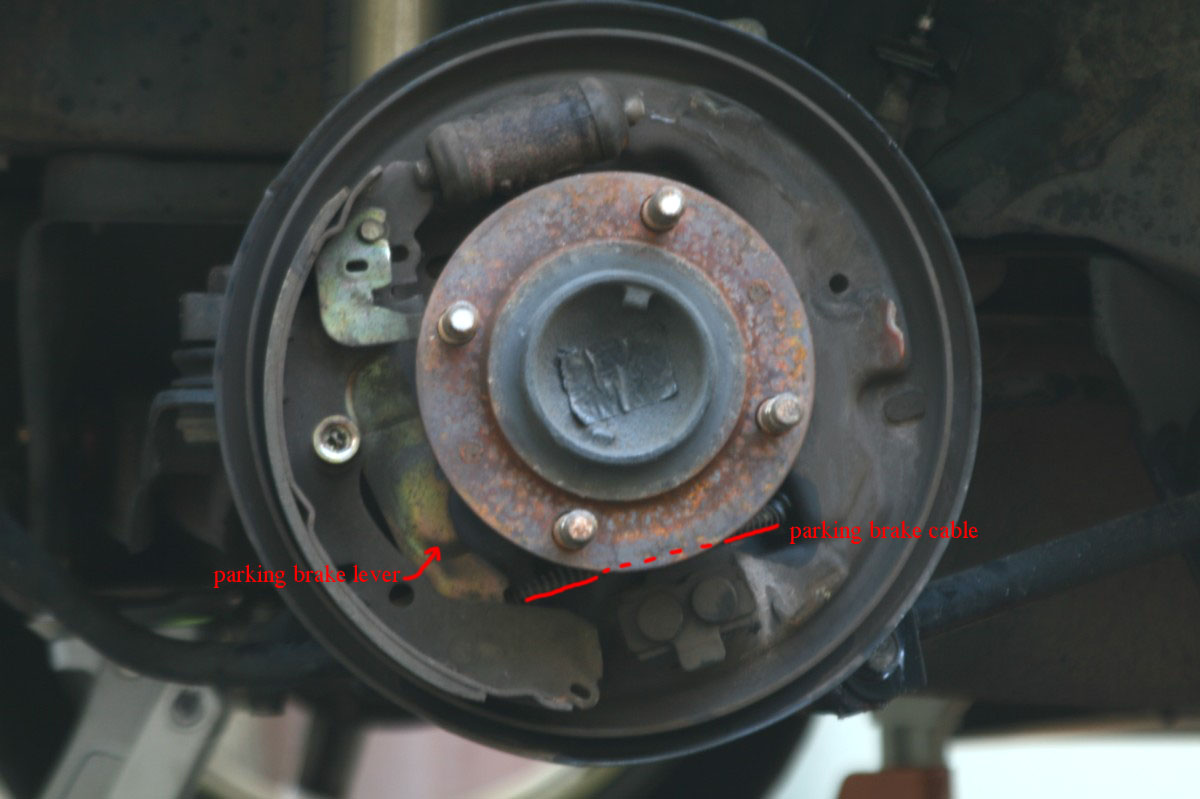
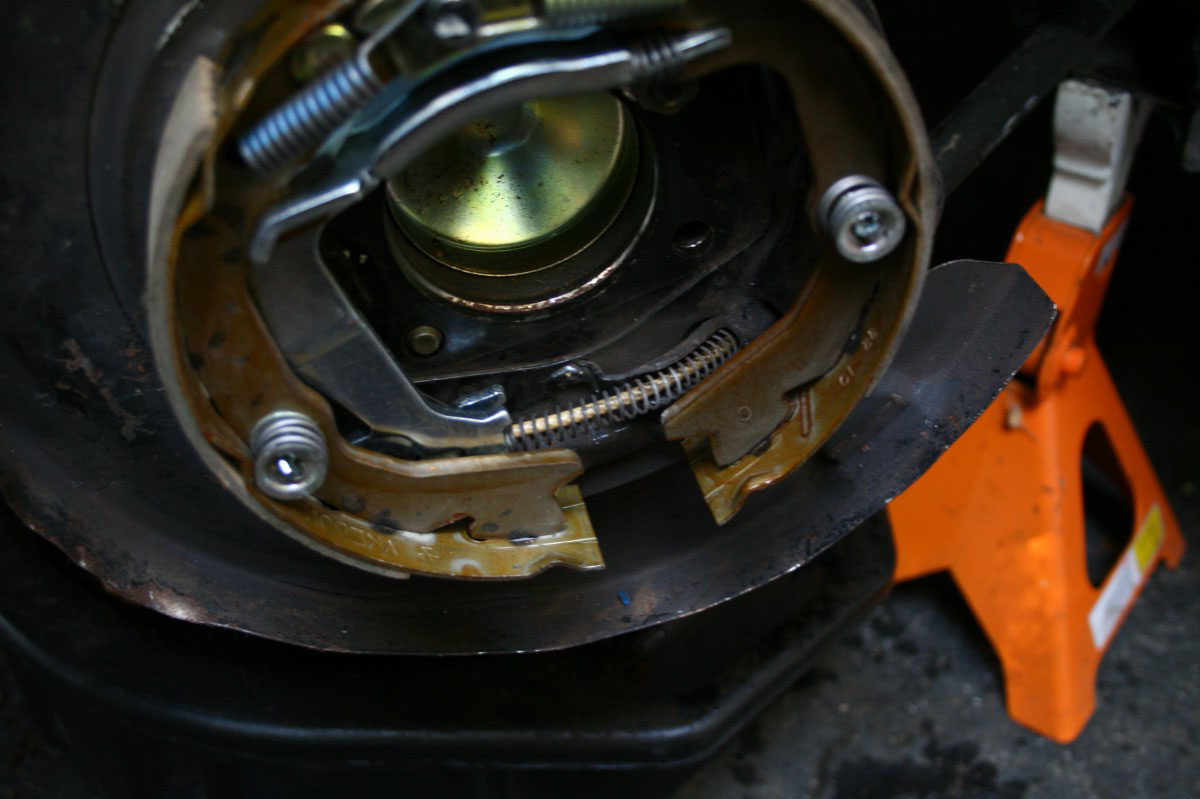
 Now begins the removal process. You simply can't remove the entire assembly because the e-brake cable is still hooked into the parking brake lever. You have to practically dismantle the entire thing to get a pair of pliers in there, so in the process pay attention to how the parts come apart, because you will be loosely repeating this when you build the new system.
 With your needle-nosed pliers, remove the spring at the bottom that pulls the two shoes together, and remove the outer top spring. It helps to remove the shoe hold-down cup and spring, by pushing inwards and twisting the cup so the hold-down pin allows the cup to slide off. Both shoes have their own respective hold-down cup, spring, and pin.
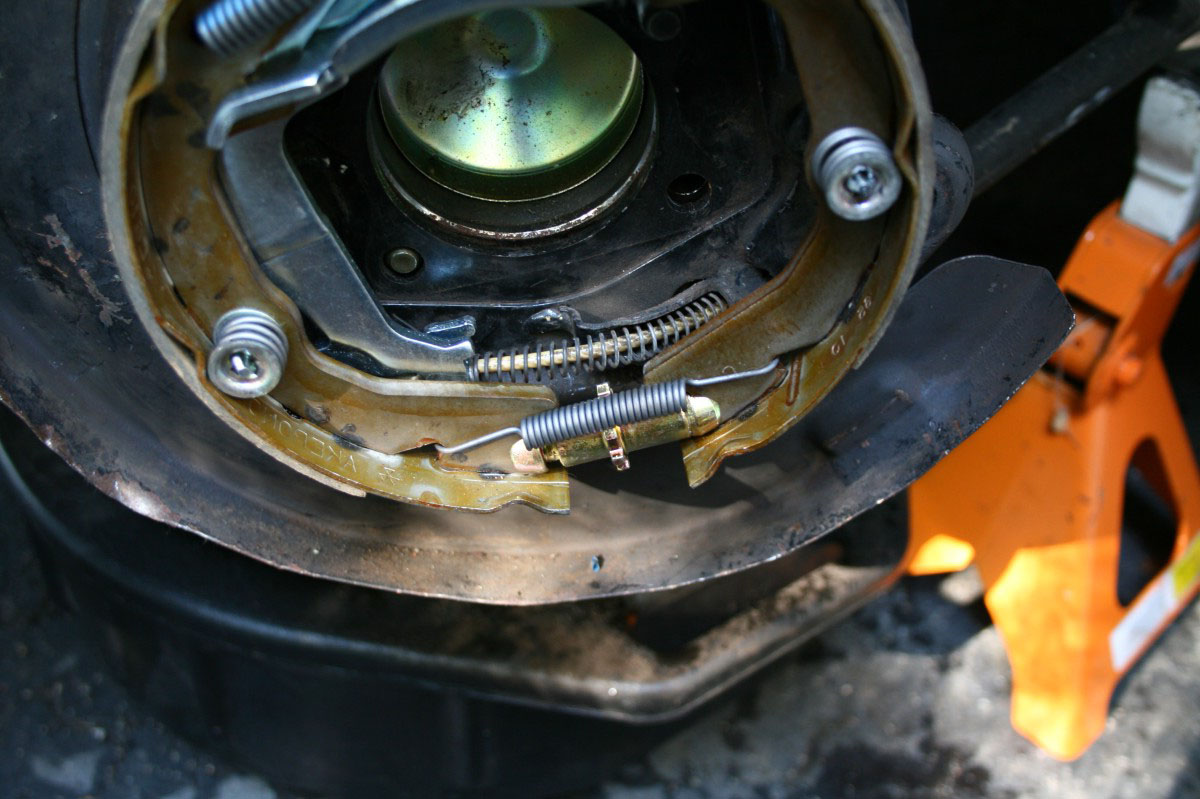
 Remove the other spring that's on top; it's slightly under the hub assembly and the other top spring you just removed. The shoe that isn't connected to the e-brake can be removed now.
 Now to remove the shoe with the parking brake lever and attached cable. Grab the shoe with your hand and push it towards the front of the car; give enough slack so you can pull the cable towards the rear while pushing forward on the shoe and lever. Since you're going to have re-adjust the parking brake lever inside the car anyways, remove the change dish at the center console, and loosen the nut for the cable (part #1 HERE) as much as possible to give yourself more play. Also, remove the last hold-down cup/spring/pin so you can slide the shoe around to no end.
 All that should remain is the cable and wheel cylinder on top. Remove the ring that holds the cable to the backing plate. Slide the cable out and put it out of the way for now.
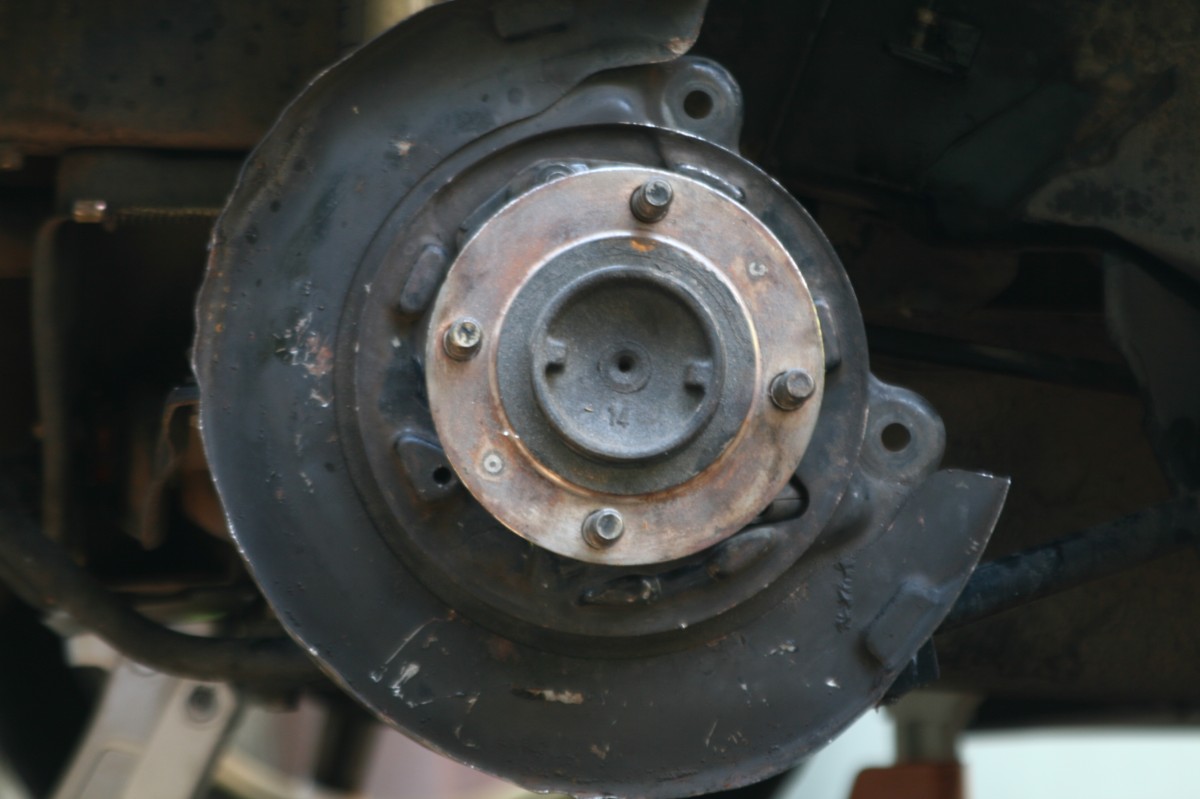
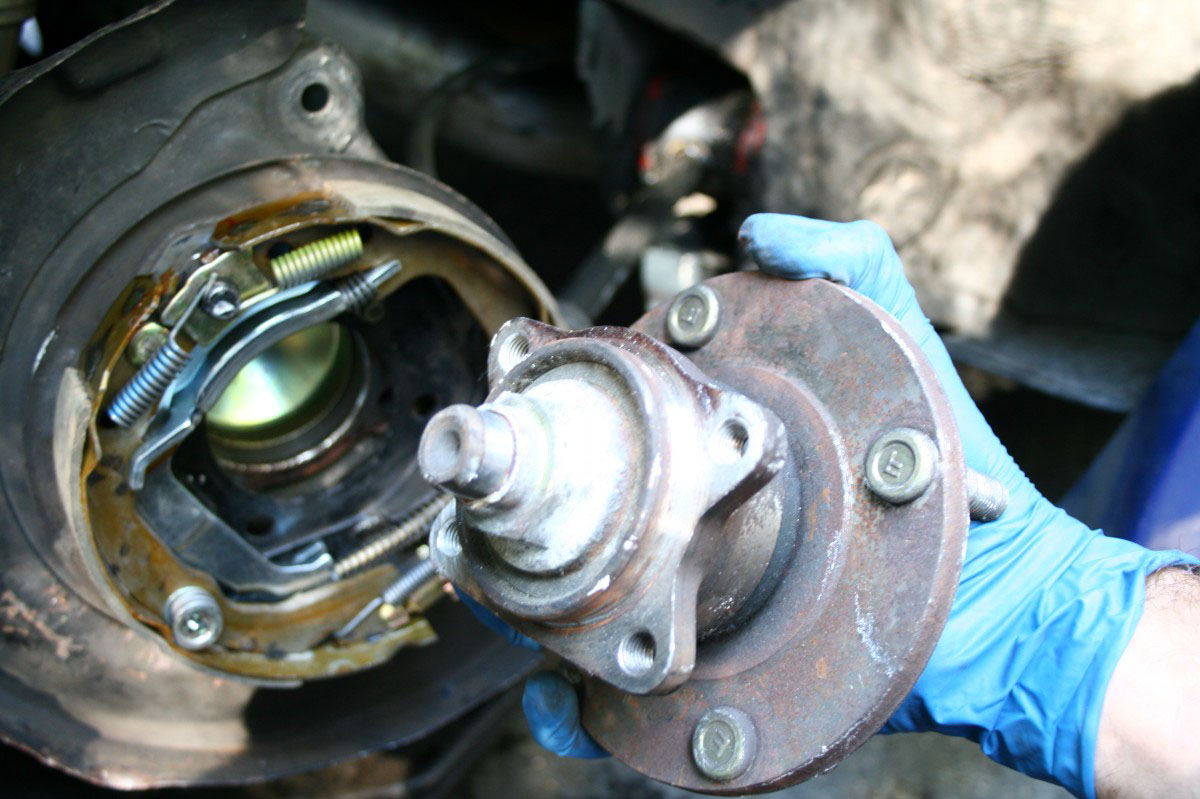
 There are 4 14mm bolts that fasten the hub and backing plate to the knuckle assembly. Break them loose and remove everything. Disconnect the hydralic brake line from behind the backing plate, and let the fluid drain into a basin. You should be looking at this <---
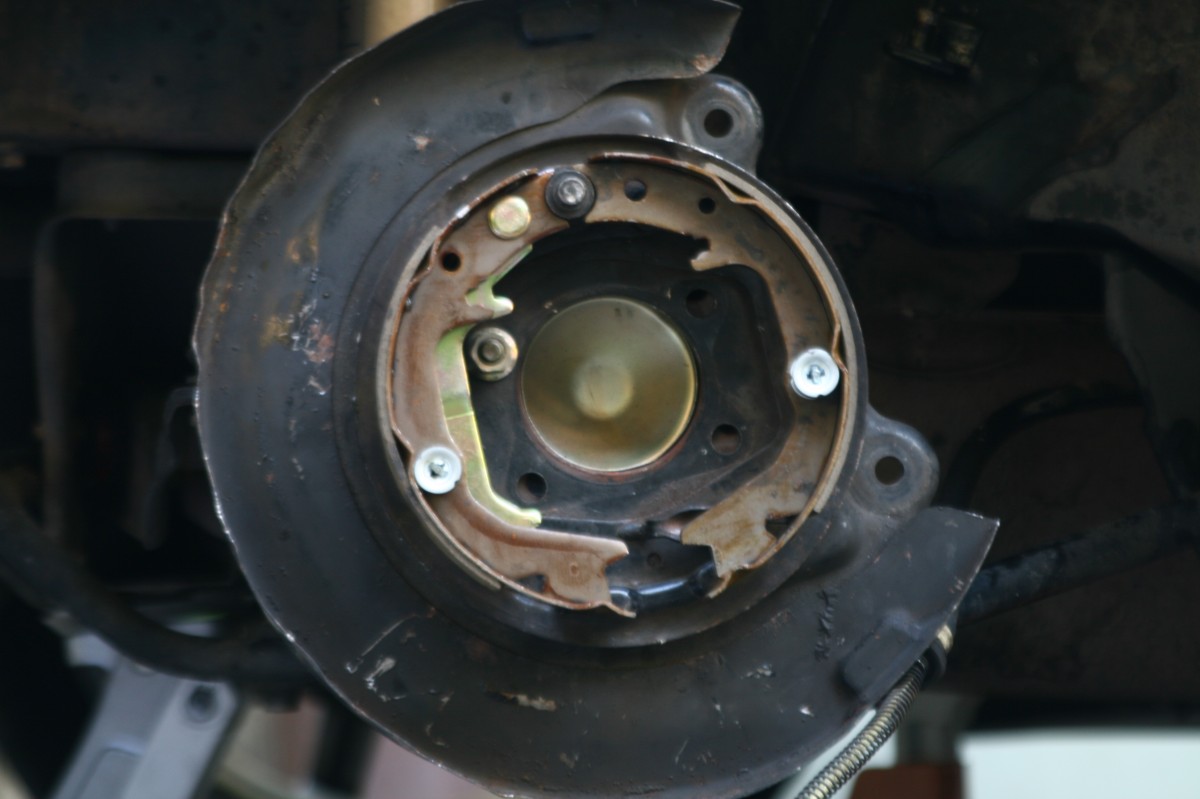
 Affix the "new" backing plate. I originally fastened the hub at the same time, but it makes building the ebrake assembly a nightmare. Remove the hub and use a spare nut and one of the 14mm bolts to secure the backing plate to the knuckle assembly (pictured in next step).
 The shoe towards the front of the car does not directly attach to the parking brake cable, so set that one first. Align the shoe so you can slide the hold-down pin through; slide a hold-down cup over the pin with the nipple facing out, next one of the hold-down springs, and then a 2nd hold-down cup with the nipple facing in. Twist the outer cup so the pin sits in the grooves perpendicular to the slits.
 This is a rough guide of how the hold-down pin/spring/cups should look. Keep in the mind, the pin is slid through from behind the backing plate, and everything else is assembled on the outside of the shoe.
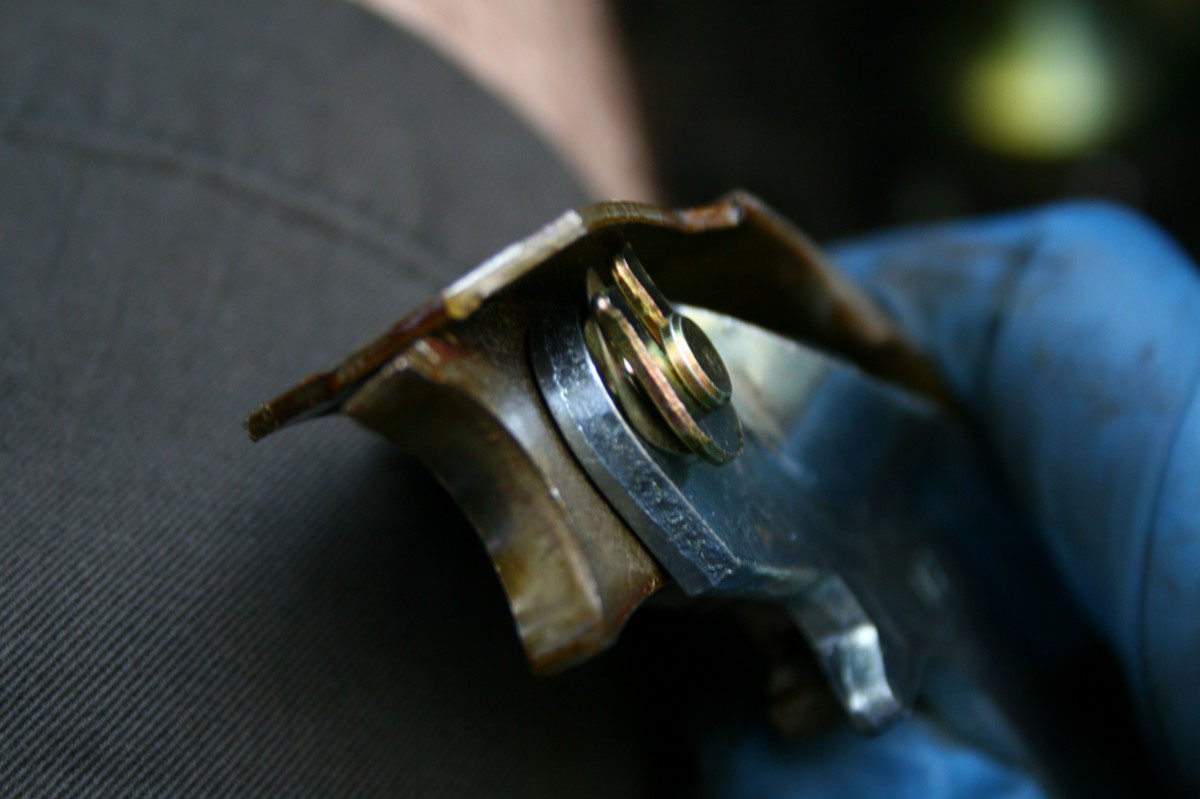 Now for the rear shoe, this one attaches to the parking brake lever and subsequently the cable. This is how the passenger side's should look, obviously turned around to see the build order. Slide the lever over the pin, then the washer, then the horse-shoe looking thing called the retainer. The lever should be able to spin with ease, with the washer and retainer keeping it from sliding off the shoe.
 Assembled. Fasten to the rear of the backing plate with the same hold-down assembly as the front shoe.

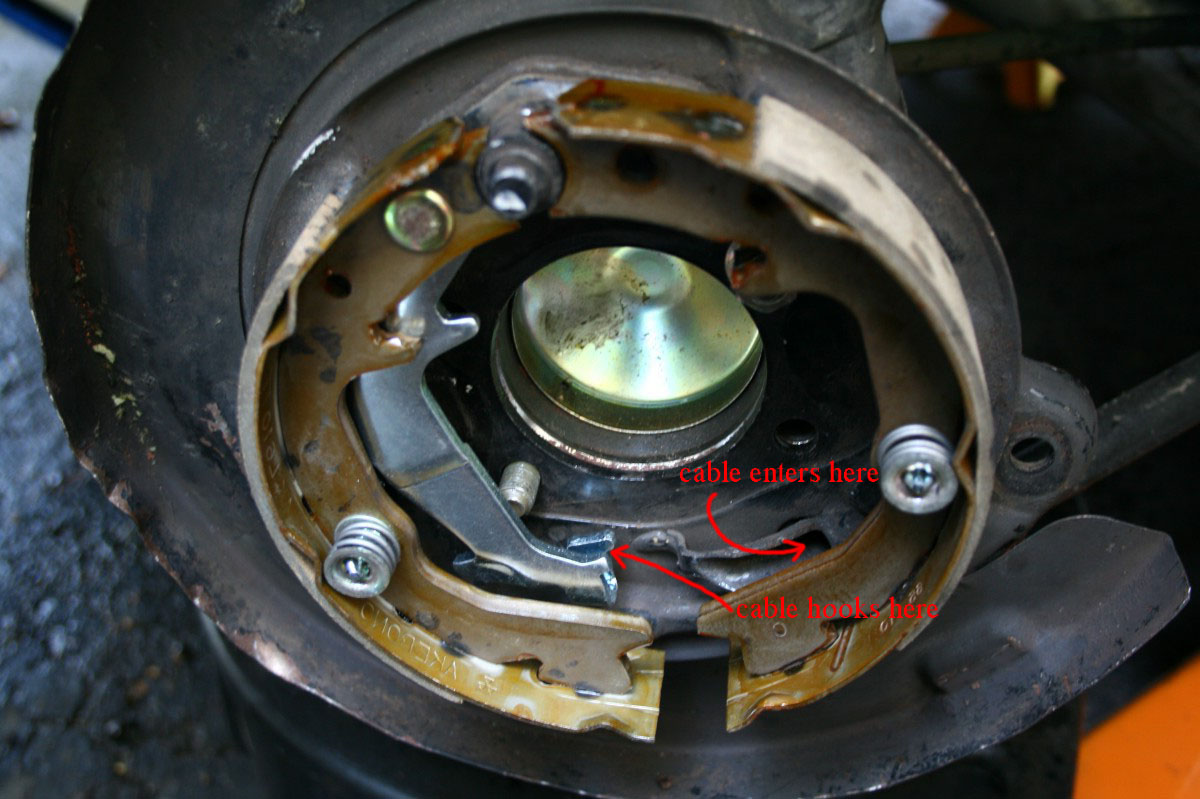 Set. Enlarge this picture to see where the parking brake cable will enter and fasten.
 Next, install the strut and strut spring.

 Slide the plate brake shoe over the strut that the two shoes pivot from; then install the two shoe return springs on top...
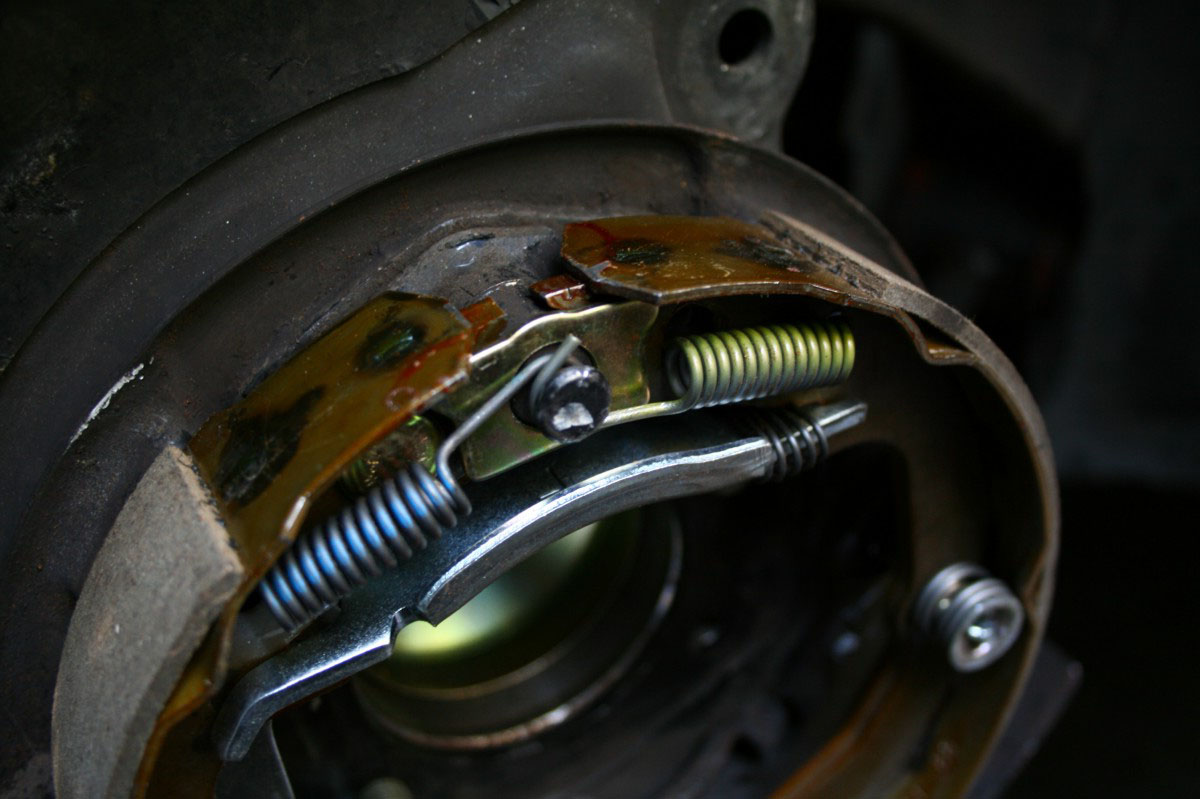 ...and hook onto the strut over the plate.
 Slide the cable through the hole, and hook onto the lever. To get the cable to hook onto the lever, slide the spring back just enough for the metal square on the end to slide into the lever's groove. ~~ This is the part of the swap I'm a little sketchy on... the service manual says a clip should hold the cable to the backing plate, like the ring did on the drums, but I didn't order this clip and can't figure out where it would go anyways. My ebrake works fine and I don't think it's extremely neccessary since the hole system is so tight in the first place.
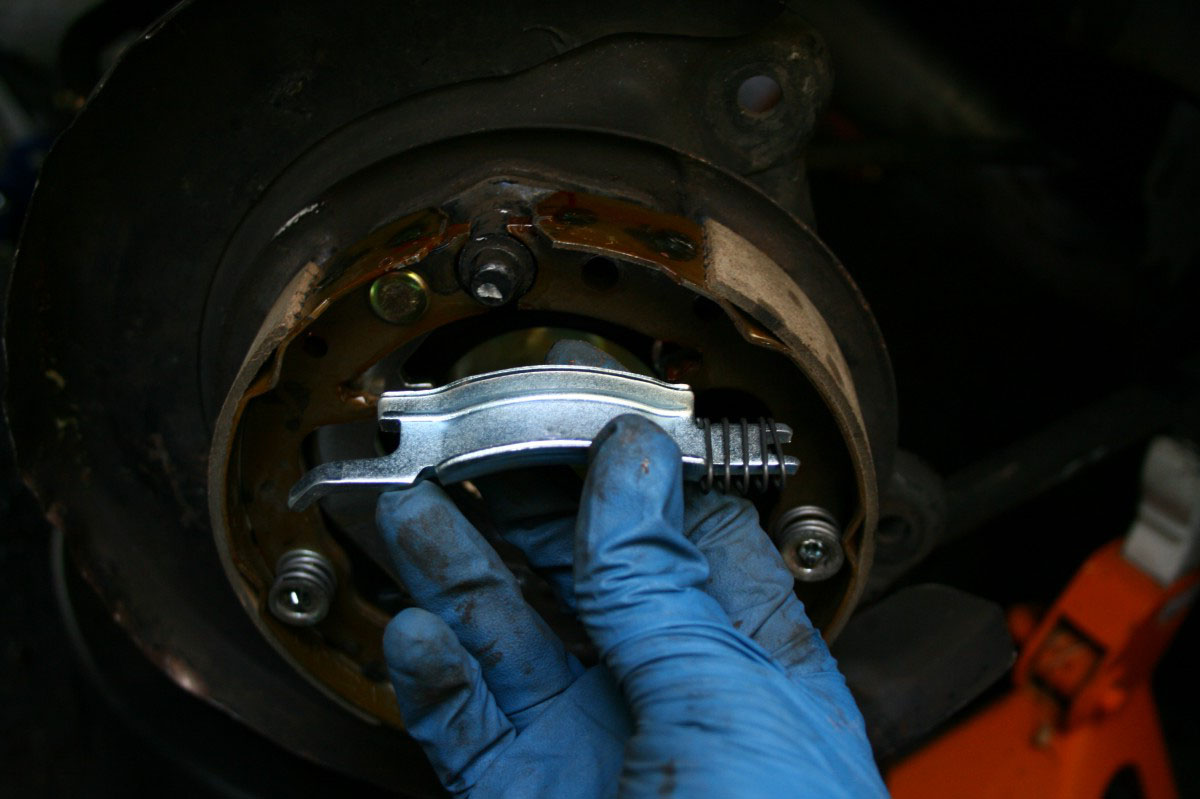
 Install the adjuster and adjusting wheel spring. Besides pulling the bottom of the shoes together, the spring also acts as a lock to keep the adjuster from spinning. For now, spin the adjuster to make it as short as possible; in this picture it's open a little bit.

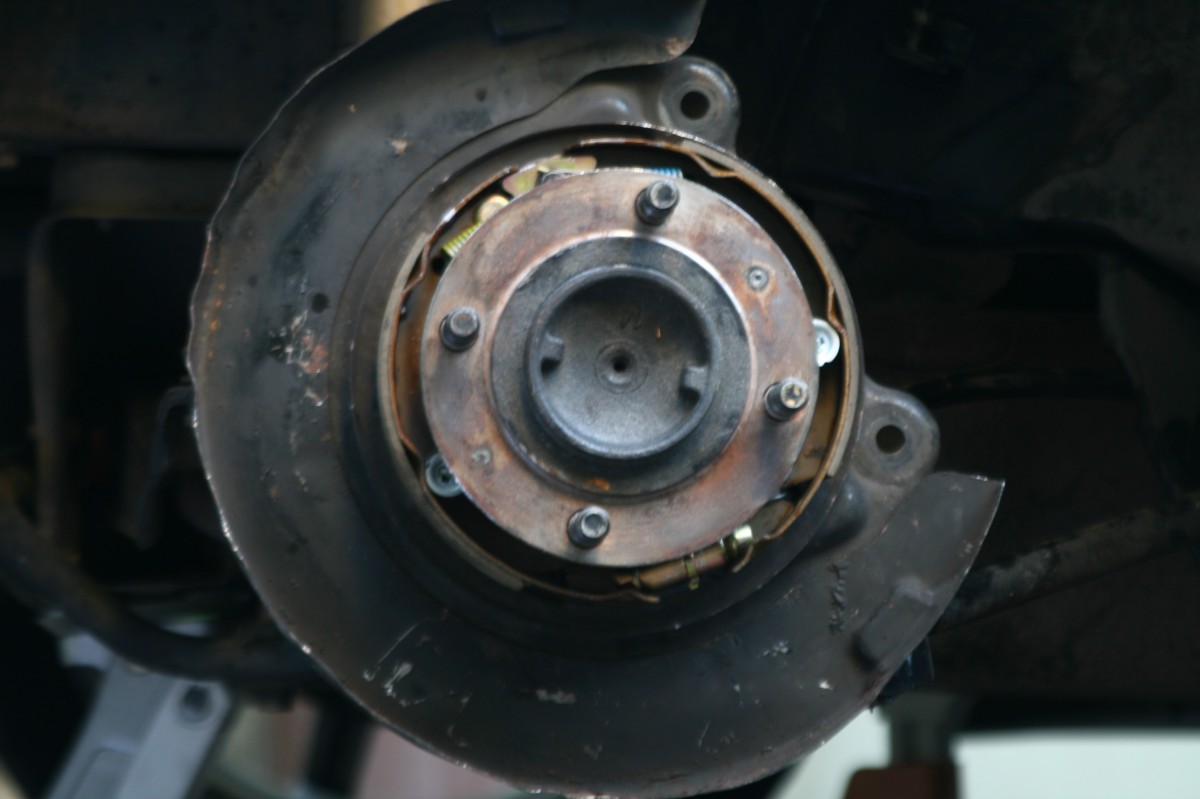
 Bolt in the hub. Service manual specifies the 4 bolts are torqued to 60ft lbs +/- 5ft lbs. The hub is not symmetrical, and you can install it upside down; ensure the more curved side is facing up, flat side down.
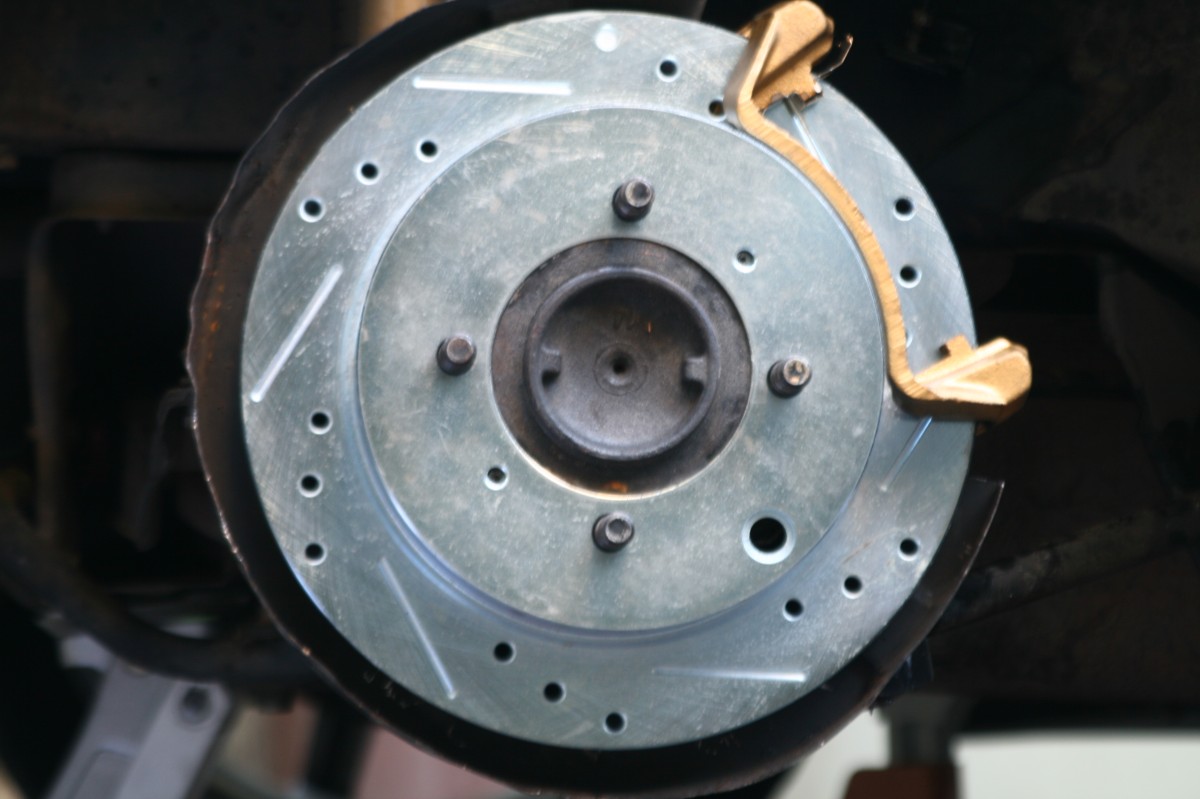 Slide on the new rotor. Before installing the caliper and pads, the ebrake needs to be adjusted so that it actually works. Bolt up the wheels and tighten their lugnuts; spin them as fast as you comfortably can, and pull the ebrake lever in the cabin. The wheels should lock to a halt with minimal noise with the lever approx. 1/2 to 3/4 at full travel. Remember their are two adjustment points; the nut directly attached to the parking brake lever's cable, and the adjuster underneath the rotor below the hub. Find an equilibrium between these two adjustment points, keeping in mind you shouldn't have to pull the lever to the upper atmosphere to lock the brake, and the wheels should spin freely with the brake disengaged. ~~ Service manual adjustment procedure is linked at top.
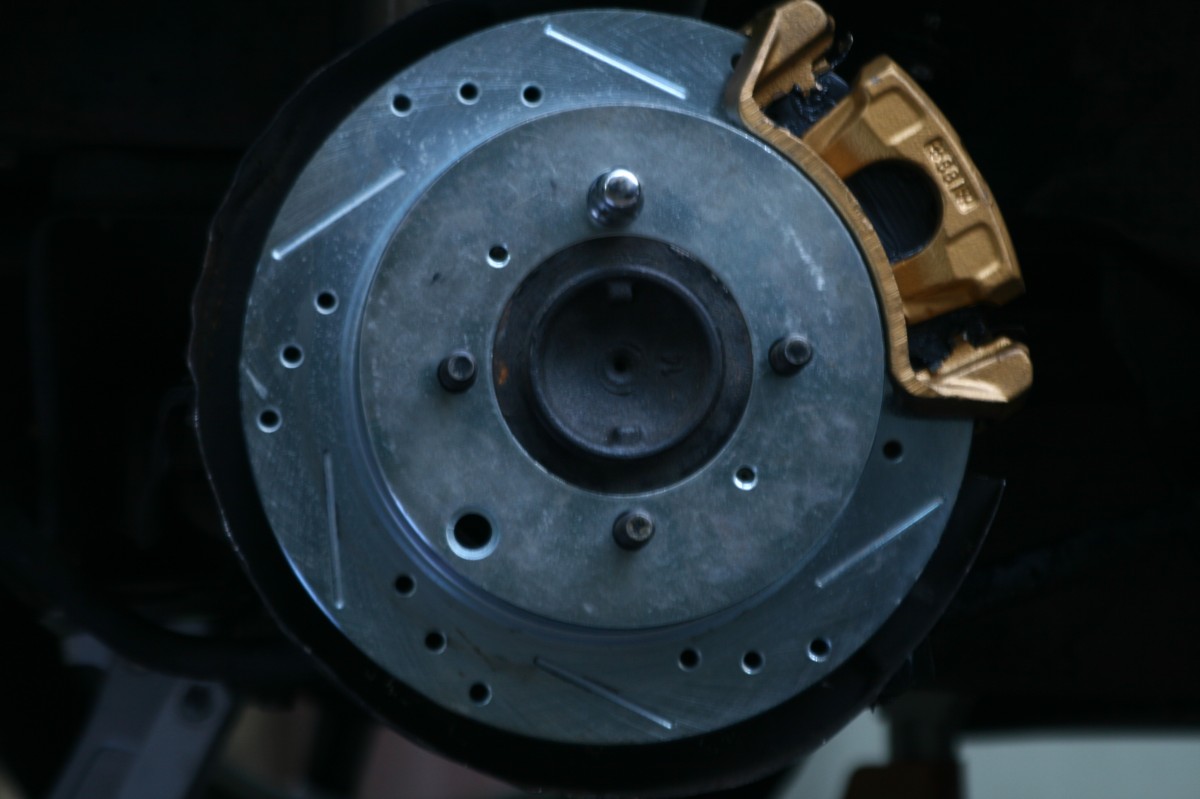 Install the clips onto the caliper support, pictured above (only 1 clip installed in photo). Install the pads with shims, and ensure the pads and clips are greased properly. Grease points noted in service manual pages linked at top. Slide the caliper over the pads, and torque the guide and lock pins to 54ft lbs. The caliper will dictate in which hole the bolts go; the hole with L is for the lock pin, and the hole with G is for the guide pin.
 IMPORTANT UPDATE!! Proportioning valve needs transplant from 2G Eclipse. Scroll down to read important safety update.
 Reinstall the brake lines, and bleed the calipers thoroughly. DOT3 brake fluid is compatible.
 Remember to torque your lugnuts, and go for a test drive.
.
.
As mentioned before, be careful of slamming on the brakes if your vehicle isn't equipped with ABS. I strongly recommend stainless steel brake lines. The difference they make is phenomenal, and you will appreciate the improved brake response and consistency. All brake pads have slightly different break-in procedures, and it's usually noted on the box. If not, a common procedure is to brake the car from 80mph to 60mph with moderate to heavy brake pressure. Do this five times total, as back-to-back as you can. Be careful not to lock up the brakes.
Quoted from an excellent write-up over at CHEVY High Performance on adjustable proportioning valves: "Drum brakes benefit from something called self-energizing action where the leading shoe uses the rotating drum to help push the larger trailing shoe into the drum with additional force, requiring less hydraulic pressure to apply the brakes."
Put simply, drum brakes require less pressure to apply the same stopping power as discs. Normally, brake bias is always towards the front, so the rears arn't so eager to lock up during turns. However, after converting your rear drums to discs, the brake bias is going to be too strong on the front brakes. For this reason, it is absolutely imperative you swap over a proportioning valve set for rear discs. I drove around for a few months before doing this and the front brakes were biting way too hard compared to the rears, and would even lock up prematurely.
Since the prop valves are mildly different, you need to re-oute the two brake lines that come from the master cylinder to the prop valve. Take your new 2G prop valve and goto your local auto parts store and get two new brake lines that thread into the valve. Get an adequate amount to run the short distance from the master cylinder to the valve, but leave some extra room for bends, remember you're not making a straight line but roughly tracing the two original lines. Buy a pro-grade flare wrench at this time that fits on the ends of your brake lines. You will also need a pipe bender to bend the hard lines.
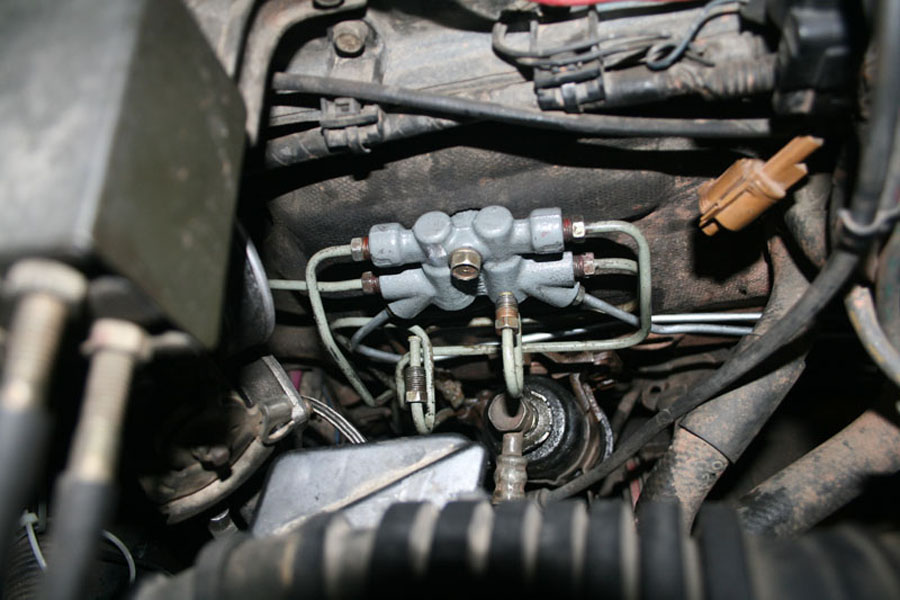
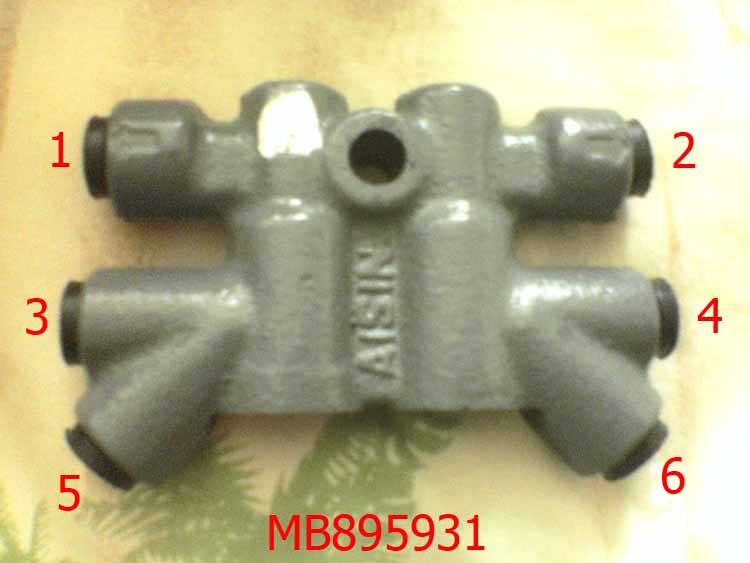 You need to swap over a prop valve from any 2G WITHOUT ABS. Mitsubishi part # MB895931. I think the prop valves from 2Gs w/ ABS is the same, but to be safe, order one with that part # and it's gauranteed fit. You're going to re-route the two lines that come from the ports on the front of the OEM valve to ports # 5 and 6 in the picture at left.
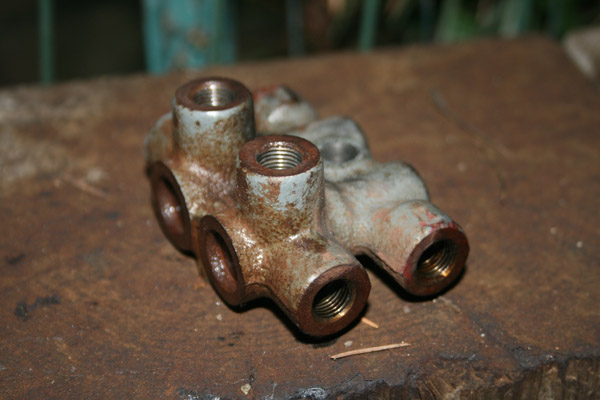
 Remove the OEM prop valve. You need a flare wrench to get the right grip on the brake line ends. Do yourself the favor and spend money on a pro-grade one, the $8 pep boys one i bought started cracking and bending by the end of the night and added hours to this. I forgot the size you need, sorry :(
 Start to line up all the lines, and begin tracing your new lines from the master to the valve.
 Tighten everything down now. Cut away the two old lines with a dremmel. Finish the last two steps from the first part of this tutorial and you're all done. Enjoy front/rear disc brake balance and stopping power.
Any suggestions, questions and/or comments are welcome. Enjoy your galant and drive safe!
peanotation@gmail.com